Beginning Again

Leave a comment

Have you ever looked out at your garden and wished you could start all over with what you know now and make the whole thing again? I’ve done a couple garden remodels over the years but this season I’m putting in a brand new vegetable garden in a new-to-me gardening spot and having a lot of fun with the process.

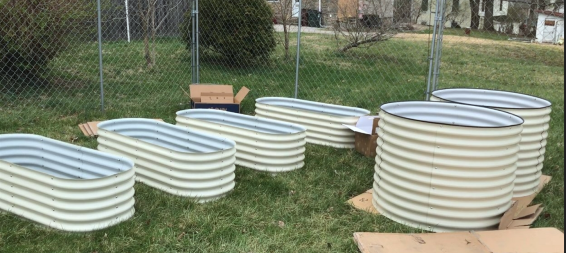
I decided right away to use raised beds. After shopping around for a while, I’m going with the Vego raised beds. Here’s what their website has to say about the material the beds are made from

highly corrosion-resistant steel substrate, hot-dip-coated in a specialized layer of Zinc, Aluminum, and about 3% Magnesium. While Aluzinc is quite impervious, the addition of Magnesium to this formula revolutionizes the metal’s ability to resist corrosion, especially on cut or raw edges. Over time as a cut edge of the metal is exposed, the Zinc and Magnesium work together to form a protective film, sealing the exposed steel substrate and protecting it from rust and corrosion.

https://vegogarden.com/pages/feature-material

I’ll be reporting back on how they do through the seasons but I have to admit, they look nice now.

Beginning to layout the new container garden

The majority of the beds in my current plan are 17″ deep, but you can see a few of the 32″ round beds for comparison. The beds are going straight onto the grass (and weeds) but they’ll get cardboard underneath before they are filled with the closest thing I could find to the ingredients of Mel’s Mix of Square Foot Gardening fame. Supply chain issues have come all the way to the garden this year but I think the mix will be close. I’ll let you know how it performs.

Garden layout design where we’re starting

The black line shows the 20’x22′ space that has been fenced off for the vegetable garden. The grey boxes at the top represent the door. Green squares are the rough shape of where the garden boxes will go. The white boxes will be covered in cardboard and a thick mulch.

What are you doing differently in the garden this year? Please share what experiments you have planned and what will be new in 2022 in your garden.

Summer of the Cucurbits

Leave a comment

When the California Rainy Season stopped almost as soon as it started last winter, I got serious about researching ways to keep the garden going thru yet another year of drought. There has been a lot of talk of water usage cutbacks, voluntary and otherwise, and I wanted to be ready. I changed everything from the way I started seeds to how much and what I compost. And I discovered that this is the perfect time to explore the many Cucurbits I have been interested in growing.

Baby-Luffa-2The “Gourd Family”, Cucurbitaceae, includes muskmelons, watermelons, cucumbers, summer squash, and winter squash and pumpkins. It’s sometimes referred to as the plant family with the most varieties grown as food for humans. This family also includes luffa, which can be grown as food or sponges, or both. (I’ll have to remember to plant some of those.) Cucurbits need warmth, sun, space, and many of them are call ‘heavy feeders’ but luckily for me, the one thing they don’t need all that much of is water. Cucurbits like to grow in well-drained places in soil that is sandier than it is clay. In wet years or humid places these plants tend to suffer from fungus or bacteria.

That makes this the perfect year to try out as many members of this family as I can find room for. I began with cucumbers which I love in a quick Asian-inspired marinade or tossed whole into the juicer. I put in ‘Persian,’ ‘Armenian,’ and ‘Homemade Pickle’ which was the first to produce a cucumber this year. And I just started seeds for a second planting of the ‘Armenian’ cucumbers in case the early plantings get ahead of me and an unpicked fruit or two stop them from producing.

I also started seven different varieties of squash. I even mapped out the different squash varieties so I could still save seed. I am growing ‘Upper Ground Sweet Potato,’ ‘Lakota,’ and ‘Spaghetti’ in the front garden, with ‘Candy Roaster Melon’ squash, ‘Sugar Pie’ pumpkins, ‘Rugosa’ butternuts, and ‘Green-Striped Cushaw’ in the back garden. That keeps the C. pepo, C. moschata, and C. maxima squash from crossing. And leaves me one spot still open in case I want to grow more cushaw-types or find another C. argyrosperma I want to try. I like the look of this ‘Tennessee Sweet Potato.’ Then I could compare it to the ‘Upper Ground Sweet Potato’ and the other cushaw-type and see what works best.

Trellised Watermelon

2009 ‘Rainbow Sherbet’ Icebox Watermelon

And then there are the melons. Last year we did not have nearly enough watermelons, and the year or two before that the kids all-too-quickly ate through what ‘Amish’ melons we had, so this dry year is a good excuse to try a few more varieties and see if we can find at least a few that will produce well for us. I’m trying the ‘Amish’ again, even though the ones I started too early are half dead. I was taking a chance that the early warm weather would stay with us, but the cool nights were too much for them. Now that it’s almost June I’m adding ‘Crimson Sweet’ to the ‘Hopi Yellow’ watermelons and ‘Kajari’ melons that are surviving. I’m trying two additional great-fleshed melons, ‘Eden’s’ and ‘Sakata’s Sweet’, one large, and one small–though in this dry year, it won’t surprise me if all the melons are small. I added one F-1 ‘Cantaloupe’ to the mix just to have something to compare against and because it was growing so nicely at the nursery, and some ‘Charentais,’ I also plan to try adding in a Tuscan heirloom as soon as the seeds come.

Do you have some favorite cucurbits in your garden? I’d love to hear which ones do well for you.

Vegetables that Flower in the California Drought

Leave a comment

SalsifyThis year it’s all about what can survive in the very low-water growing conditions we’re experiencing on the left-side of the country. In the Dirt to Dinner garden a lot of my growing is focused on squash, cucumbers, melons, and a few other drought-resistant crops. Which apparently includes salsify and  artichokes. I just have two artichoke plants near one another in a corner of the garden and they are feeding my family and two others with all the artichokes we need and some of the buds have still flowered and gone to seed. It’s a hot, dry spot, surrounded on two sides by sidewalk, and, honestly, I have not been very attentive to the patch this year–at all. Maybe the roots are feeling the drought pressure and sending out as many buds as possible to insure survival long-term? I honestly don’t know, but please pass the Hollandaise.

Another crop doing especially well this year is the runner beans. Runner beans are happily perennial in my climate, but they don’t last forever. Most years they all die back to the roots for the winter and in the spring it’s normal for a Front Runnersfew not to regrow. I don’t have them tagged by year, so I can’t tell you what their life-span should be, but under my high-stress growing conditions I’m pretty thrilled with the return rate. This year they were especially early, growing new vines and leaves by early April. And now, in spite of the unusually cool spring temperatures and cloudy (but rainless!!) days, they are beginning to flower. This year I have added in additional patches of ‘White Romanian’ runner beans, which I understand will have fully white flowers, instead of the lovely, hummingbird-attracting plain-red, red-and-white, or red-and-pink flowers most of my other beans grow. I like runner beans for their usefulness at all stages of bean production, their beautiful flowers, and the big, fat dry beans they give me for chili or soups all winter. If they are also able to produce in spite of the lack of moisture I will have just the excuse I need to collect even more of them. ;-)

I am also surprised and pleased by how well the potatoes are doing with very little water in their tall beds of straw. Potatoes probably should not be your first choice as a sustenance crop in an arid climate, but I love them and started them as early as possible this year to take advantage of what moisture was available while the weather was still cool and as of Memorial Day weekend, I have to say I am encouraged. The soil around the stems is dry and dusty, but the plants look healthy and have moved through their Sleep, Creep, and Leap stages pretty much on-time. The ‘Ozette’ fingerling potatoes in the back garden are slower-growing than I would like. I don’t know if that’s the variety or the conditions. Since they are often referred to as the oldest variety in commercial cultivation, I am willing to bet they are widely adapted and will do their best in their mulch pile on their own schedule.

LaRouge Potatoes

Two Ways to Grow Squash for Seed Saving Even in a Small Garden

Leave a comment

There are a few varieties of squash my family cannot do without. We require spaghetti squash with sage and browned butter in the summer, pumpkin for pies in the fall and if there was no butternut squash with bacon crumble for Thanksgiving, there would be a riot at the dinner table. And don’t forget Grandma’s zucchini bread. So, how do I save seeds without the squash crossing until they are all one inedible warty squash mutant?

Lazy Gardener Methods

Kakai PumpkinIt’s easier than you might think even though the fat, black Carpenter bees in my garden love squash flowers and will happily mix pollen from one flower into another all day long. There are four main species of edible squash. The ‘Rugosa’ Butternut squash I favor is from the species Cucurbita moschata. To keep it from crossing all I need to do is keep it away from other squash I want to grow that are in the same species. For us that means the ‘Tromboncino’ that we often use in place of a true zucchini needs to be as far away as possible from the “Rugosa’ patch.

I can grow the spaghetti squash that we like right next to the “Rugosa’ because the spaghetti squash is a Cucurbita pepo. But it can’t be near the pie pumpkins because they are also C. pepo. As long as you know which species of squash you are growing, you can separate them enough to prevent most cross-pollination. I do this by growing one variety of each species in front of the house and one behind. You could plant on either side of a hedge or other windbreak and do a pretty good job of keeping your variety breeding true. Or you can separate the plants with time. If I put in my spaghetti squash very early from transplants, or under a row cover, or both, and I don’t plant out my pumpkins until the spaghetti squash have each set a few fruits, then I can grow the pumpkins right beside my developing squash and pinch off any extra flowers that try to develop on the spaghetti squash plants once the pumpkins start to flower.

Precision Gardener Methods

Hubbard Squash

A Mother of a Hubbard

If you are determined to maintain a squash variety with maximum purity, you have several options. You could alternate years of growing for varieties that are in the same species. Year One I would grow ‘Rugosa’ squash and then can or freeze what we would need during Year Two when I would be growing the ‘Tromboncino.’ But even then, a bee from a neighbors garden could stop by and ruin things inadvertently. You could alternate days, or even weeks, when you “cage” one of the varieties or the other. Large sheets of row cover are best for this with squash and you would have to be sure you tucked in the edges and laid a board or something heavy over them to make sure they didn’t blow off exposing both varieties to insects at the same time.

Or you could hand-pollinate, which sounds fussier than it actually is. You have to keep an eye on your squash blossoms as they develop and know which are male and which are female. And you will need to tape the female flowers that you want to hand-pollinate shut to prevent them from opening on their own, ideally the night before they would have opened. You pollinate that flower with pollen you know came from a male flower of that same variety and then you tape that flower shut again and tag the baby squash behind it so you can save the seeds only from the tagged squash. If I’m making this sound complicated, check the videos or instructions available on the Internet. This is the best method if you are preserving a rare variety, a family heirloom, an unusual squash where you won’t be able to easily get more seeds, or if you are saving seeds for trading and sharing.

If you have favorite seeds saving methods for squash, we would love to hear them. Please share in the Comments.

5 Ways to Get Your Food Garden Through the Drought

Leave a comment

As farmers in California fallow more and more acreage, and water restrictions come to us in the cities, there are a lot of things that can be done to keep urban gardens going.

#1. Compost Everything. The best thing you can do to help your soil hold moisture is to mix it with composted organic matter. So no more tossing potato peels into the disposal. (Like you’ve got water to waste running the disposal anyway.) It is time to compost everything you can get your hands on. Food scraps, newspaper, junk mail, dryer lint, coffee grounds, egg cartons–the works. If it’s organic matter and it will break down, there’s a spot for it in the pile. And that pile needs to be in a shaded and/or covered spot where the sun and wind will steal as little of the moisture that goes into the pile as possible. Toss the dirtier grey water you should be saving from inside the house over it when you can but avoid adding soaps to the compost pile as they can inhibit the bacteria working their magic inside the pile. Build one pile and then start a second one while the first pile ‘cooks.’ As soon as it is ready, work it into the top layer of soil, just under your mulch layer.

Chipping Delivery#2. Mulch Everything. And I mean everything. Paths, empty patches where nothing is growing, all of it. Use a light-colored material if possible to keep the soil cooler. I started with a couple of truckloads of fruit tree chippings. Tree companies will dump them for you for the asking as it saves them paying to put them somewhere else. My entire yard is covered in a thick layer of this mulch that has been breaking down for a few years now. In the growing areas, I cover as much as I can with rice straw. It’s light-colored and it’s light-weight material that doesn’t compact the soil underneath and air still circulates well. And if it starts to break down too much, or if there is leftover straw that doesn’t get used, it goes right into the compost pile.

Ollas in the garden#3. Water Through the Soil–Not Through the Air. I use a combination of ollas and Plant Nanny wine bottle-style terracotta watering stakes to put moisture straight into the ground without spraying it through the air. This allows the soil to draw the water that it needs through the unglazed terracotta, so it’s never wasted. You can fill the ollas and wine bottles with grey water from the house and the clay will even provide a bit of filtering. And, if the top inch or even two of soil dries out, plant roots can still get water from the moist soil at the bottom of the ollas or Plant Nanny. I use brightly colored clay birds to top my ollas so that I can find them in the mulch to fill them again.

Rice straw mulch in the vegetable garden#4. Lower Raised Beds. If raised beds increase drainage and allow the soil to warm more quickly, well, that is exactly what we don’t want this year. In several spots in my garden I am growing in-between what would normally have been my beds. I took up the mulch from the paths between the raised beds, added compost and some of the nice fluffy soil from the taller beds, and planted in the low spots that used to be my paths creating ‘sunken beds.’ It is my theory that these will reduce drainage and slow the drying of the soil. I laid wide stones on the raised bed section so that I can walk on them with minimal compaction and go back to growing in them for the Rainy Season, should we get to have one this year.

Tomato Seedlings#5. Start All Your Seeds Inside and Transplant. I know beans and squash and melons don’t care for being transplanted, but it is so much more efficient to water a small flat or a tray of seed starts than it is to water a whole bed with only a dozen or so plants coming up in it. And the even temperature and protection from wind inside the house will also help. I move peas and beans outside as soon as they have true leaves because their roots quickly extend through the bottom of even my deepest redwood flats. Once you have seedlings outside and are watering anyway, you could seed some companion lettuce or other greens nearby to germinate in the moisture available from around the seedlings.

What are your plans for food gardening this year? Please share your drought-survival tips with us all in the Comments.